Reparacion Automotriz
- Inicio
- Productos
- Categorías
- Productos Destacados
- Pistola de Pulverización de Alto Rendimiento
- PPS™ Serie 2.0
- Pintura de 1 paso 3M™ Perfect-It™
- Sistema de lijado limpio de 3M
- Abrasivos Blue Net
- Adhesivos Estructurales
- Lija al agua 331Q
- Recursos
- Demostración Virtual - Pistola de Pulverización de Alto Rendimiento
- Demostración Virtual - Sistema de Lijado Limpio 3M
- Procedimientos
- Soporte

Local Repairs
-
Local Repairs
3M have developed dedicated Local Area Repair processes with 3M products to help you carry out repairs effectively. The processes in this guide can help you to produce fast, efficient, repairs ensuring you deliver a rapid repair to your customer.
-
Steps 1-5Step 1
Wash and preclean the entire panel using 3M™ Professional Panel Wipes 34567 and 3M™ Adhesive Cleaner 08984.

Step 2
Compound the entire panel using 3M™ Perfect-it III™ Fast Cut Plus Compound 50417 (and 3M™ Perfect-it III™ Extra Fine Compound 80349 if a dark colour) to get the panel back to a freshly painted appearance.

Step 3
Sand out the defect using a 3M™ Hookit™ Abrasive P180 or P320 76mm Disc. (Always start with the finest grade possible). N.B. The use of 76mm discs helps to minimise the size of the repair area.
Apply a stopper if required and sand using 3M™ Hookit™ Abrasive P180 / P320 Disc or Sheet. (N.B. At this stage, the use of a 127mm handblock will help to keep the repair area smaller.)

Step 4
Sand around the repair area using 3M™ Hookit™ Abrasive 125mm P320 and/or P500 disc.

Step 5
Enlarge the area further using a 3M™ Microfinishing 125mm P1000 260L Film Disc 01053 (N.B. Mask adjoining panels to protect during this process).

-
Steps 6-10Step 6
Any areas that will contain a clearcoat blend should be sanded with 3M™ Trizact™ Fine Finishing Disc 125mm P3000 02096.

Step 7
Clean, degrease and mask out the area to be painted.

Step 8
Locally mask out the area to be primed, using 3M™ SEMFT+ 50421 and Taped Masking Film (N.B. If appropriate apply 3M Smooth Transition Tape 06800 for clear coat application).
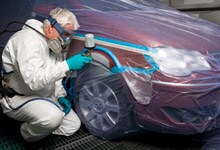
Step 9
Apply the primer using 3M™ Paint Preparation System (PPS) following the paint company recommendations.
Step 10
After curing remove the local masking and sand the primer using 3M™ Hookit™ 125mm P500 Disc and /or P800 Grade 3M™ Soft hand Roll Perforated 216u hand sheet.

-
Steps 11-15Step 11
Clean, degrease and tack off the area to be painted using 3M™ Tack Cloth Aqua 50401.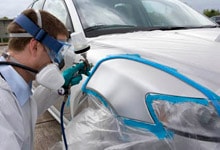
Step 12
Apply the basecoat using 3M™ Paint Preparation System (PPS) to the primed area again following paint company guidelines.
Step 13
Once the basecoat is thoroughly dry, carefully ‘Tack’ the area using the 3M™ Tack Cloth Aqua 50401. Apply the clearcoat to the basecoat area and then fade the edge away using the blending agent.
Step 14
After the clearcoat is fully cured, remove any defects using the 3M™ Microfinishing 260L 125mm P1500 Disc 01051 or the 3M™ Trizact™ A5 Disc 50079 on the 3M™ Finesse it sanding block 50199. The 3M™ Trizact™ 125mm P3000 Disc 02096 can be used on the blend area to reduce the overspray.

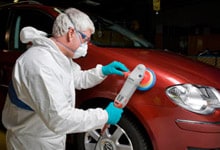
Step 15
Using the 3M™ Electric Polisher 64393. Compound using 3M™ Perfect-it III™ Fast Cut Plus Compound 50417 followed by 3M™ Perfect-it III™ Extra Fine Compound 80349 to blend the new and old paintwork. (N.B. On the clearcoat blend area, use the polisher at a reduced speed and use a light spray of water to prevent any heat build up.)
What Next?
More From 3M
You might also like to view


Getting in touch
Mándenos un correo electrónico
Formulario on-line
Tiempo de respuesta
24 - 48 horas
Llámenos por teléfono
54 (0) 348 465 9400 opción 1.
Lunes – Viernes
8:30 a.m. - 6:00 p.m.